Complete all 4 steps before the workshop. Total time: about 20 minutes. If you get stuck on any step, email [email protected] and we’ll help.
Pre-Work Setup Guide
Build Your First AI Agent
Complete these four setup steps before the workshop. Total time: about 20 minutes. You'll arrive with everything installed, configured, and ready to go.
What You'll Walk Away With
A running cloud server with OpenClaw installed
API access to frontier AI models via OpenRouter
A personal Telegram bot connected to your agent
Everything configured with a single setup command
1
Telegram
2
API Key
3
Server
4
Setup
Step 1 of 4 · ~5 minutes
Install Telegram & Create Your Bot
Telegram is the mobile messaging app your AI agent will live inside. You’ll send it commands and receive responses from your phone, like texting a very capable assistant.
- Download Telegram on your phone using the button above for your device (iPhone or Android).
- Create an account using your phone number. Telegram will send a verification code via SMS.
- Open the app and confirm it works. Send yourself a message in "Saved Messages" to verify.
Already have Telegram? Skip to step 4 below to create your bot.
Create Your Telegram Bot
Your AI agent needs its own Telegram bot to send and receive messages. You’ll create one using Telegram’s built-in bot builder, called BotFather. Takes about two minutes.
- Open Telegram on your phone. In the search bar at the top, type @BotFather and tap the result with a blue checkmark. Tap Start at the bottom.
- Send the message
/newbot. BotFather asks for a display name. Type whatever you like (e.g., "My Workshop Agent"). - BotFather then asks for a username. It must end in
bot(e.g.,myworkshop_agent_bot). If the name is taken, try adding numbers or underscores until one works. - BotFather replies with your bot token. It looks like
7123456789:AAFabc123.... Copy this token and save it somewhere you can find it again (a note on your phone, a text file, or paste it in Saved Messages). You will need it in Step 4.
Write down your bot token now. You’ll paste it during setup in Step 4. If you lose it, you can retrieve it from BotFather by sending /mybot, selecting your bot, and tapping “API Token.” Treat this token like a password.
Step 2 of 4 · ~5 minutes
Get Your AI Key
OpenRouter gives your agent access to AI models from multiple providers (Anthropic, OpenAI, Google, Meta) through a single API key. You load credits and pay only for what you use. We’ll also use these models during the workshop.
- Go to openrouter.ai and click "Sign Up" (or "Get Started"). Create an account using your email, Google, or GitHub.
- Once logged in, navigate to Keys in the left sidebar (or go to openrouter.ai/keys). Click Create Key, give it a name like "Workshop," and click Create. Copy the key (it starts with
sk-or-) and save it somewhere safe. You won't be able to see it again. - Go to Credits in the sidebar and add at least $5 to start. This will last weeks of normal usage.
Keep your API key private. Anyone with this key can use your credits. Don’t share it in chat rooms, commit it to public code repositories, or post it anywhere.
Step 3 of 4 · ~10 minutes
Deploy Your Cloud Server
Your AI agent needs a computer that runs 24/7. DigitalOcean provides a cloud server (called a “droplet”) for about $24 per month. We’ll deploy OpenClaw on it using their one-click Marketplace image.
Why DigitalOcean?
Simple dashboard designed for beginners
One-click OpenClaw deployment from the Marketplace
Built-in security: firewall, sandboxing, rate limiting
Cancel anytime, billed hourly
Create Your DigitalOcean Account
- Go to digitalocean.com and click "Sign Up."
- Create an account with your email or sign in with Google/GitHub. You'll need to add a payment method (credit card or PayPal).
- Verify your email address if prompted.
Create Your Droplet
- From the DigitalOcean dashboard, click the big green Create button in the top-right corner, then select Droplets. A "droplet" is just DigitalOcean's name for a virtual server: a computer in the cloud that stays on 24/7.
- Choose Region. This is the physical location of your server. Pick whichever city is closest to you. For example, New York if you're on the US East Coast, San Francisco for the West Coast, or London for Europe. It doesn't matter which datacenter number you pick within that city (e.g., NYC1 vs NYC3). Just pick the nearest city and move on.
- VPC Network. You'll see a dropdown that says "default" with some text about private IP addresses. Don't touch this. Leave it exactly as it is.
- Choose an image. This decides what software comes pre-installed on your server. You'll see tabs across the top: OS, Marketplace, and Custom images. Click the Marketplace tab. In the search box, type "OpenClaw" and select the result called OpenClaw. This is a one-click image that installs your AI agent platform automatically.
- Choose Size → Droplet Type. You'll see two columns: Shared CPU and Dedicated CPU. Make sure Basic (under Shared CPU) is selected. It should be selected by default. This is more than enough power for what we're building.
- Choose Size → CPU options. You'll see three tabs: Regular, Premium Intel, and Premium AMD. Select Regular (the leftmost tab; it may already be selected). This uses standard SSD storage, which is all we need.
- Choose Size → Plan. You'll see a row of plan cards with different prices. Select the $24/mo plan (4 GB memory, 2 CPUs, 80 GB SSD Disk, 4 TB transfer). OpenClaw needs at least 4 GB of memory to run reliably. (We tested the $6/mo tier. It doesn't have enough memory to run OpenClaw without crashing. The $24 plan is where we landed after trial and error.)
- Additional Storage. Skip this entirely. You do not need extra storage.
- Backups. Skip this. Leave it unchecked. You won't need automated backups for this workshop server.
- Choose Authentication Method. You'll see two options: SSH Key and Password. Click Password. This lets you log in with a simple password instead of setting up SSH keys (which is more complex). Create a strong password that meets the requirements shown on screen: at least 10 characters, include an uppercase letter (not first or last), include a number, and can't end in a number or special character. Write this password down somewhere safe. You'll need it in a few minutes.
- We recommend these options. You'll see two checkboxes. Leave "Add improved metrics monitoring" checked (it's free and harmless). Do not check "Add a worry-free Managed Database," which costs an extra $15/month and you don't need it.
- Finalize Details. You'll see a hostname field with an auto-generated name. Don't change anything here. The default name is fine.
- Click the Create Droplet button at the bottom of the page. DigitalOcean will start building your server. Wait 60 to 90 seconds. You'll see a progress bar. When it finishes, your droplet will appear with a green dot and an IP address (a number that looks like
164.90.xxx.xxx). Copy this IP address. You'll need it next.
Step 4 of 4 · ~5 minutes
Set Up Your Agent
When you first log in to your droplet, a setup wizard walks you through connecting your AI provider and dashboard. After that, one command handles the rest: unlocking capabilities, enabling Telegram, and pairing your account. Have the bot token from Step 1 ready.
Click More next to your droplet name in the DigitalOcean dashboard. In the menu, click Access Console. On the Console Page, it will ask who you want to log in as. Type
rootand click Launch Droplet Console. A terminal window will open. Sometimes this is glitchy if you just setup the droplet. Grab a cup of coffee or check your email then try it again if you have issues the first time connecting to the console.- A setup wizard will appear automatically. It asks you to select an AI provider. Type
4and press Enter to select OpenRouter. When asked for your API key, paste the OpenRouter key you saved in Step 2 (starts withsk-or-). Press Enter. The wizard will ask: "Do you want to run pairing automation now?" Type
yesand press Enter. It will print a Dashboard URL and a Gateway Token. Open a new browser tab and go to that Dashboard URL. You'll see a "disconnected" error. That's expected. Follow the three steps shown in the screenshot below: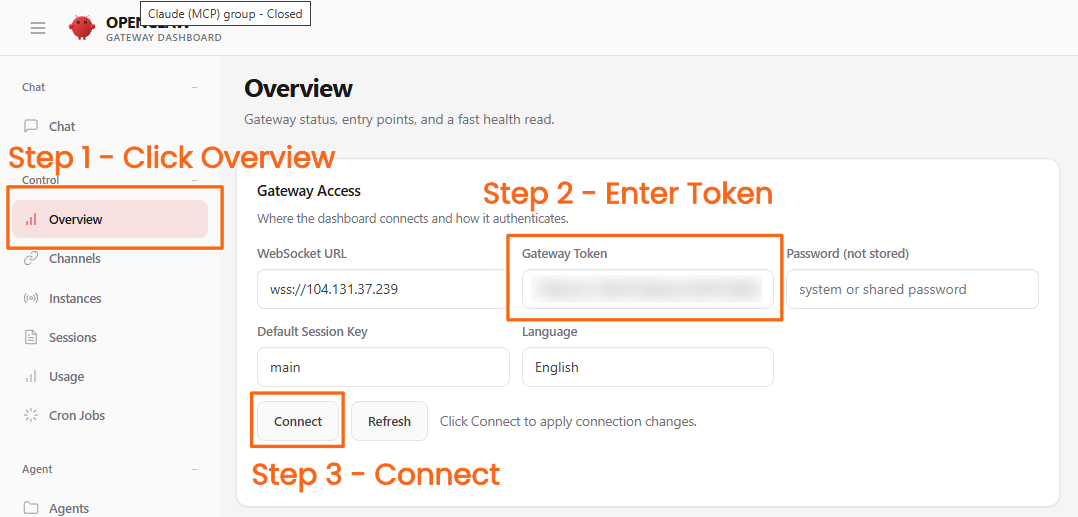
After clicking Connect, you'll see a "pairing required" error. That's also expected. Go back to the Console and type
continue. You'll see "Pairing request approved!" and "Setup complete." The dashboard should now show connected.- Back in the Console, paste this command and press Enter:
curl -fsSL https://www.laziopartners.com/setup/openclaw-workshop | bashThe script unlocks your agent's capabilities, enables Telegram, and prompts you for the bot token you saved in Step 1. At the end, it will ask you to send a message to your bot in Telegram and paste back the pairing code. Follow the prompts on screen.
- When the script finishes, send another message to your bot. It should respond with an actual answer. If it does, you're done.
Keep your bot token secret. This token gives full control of your bot. Treat it like a password.
Pre-Flight Checklist
Confirm you have all four items ready. Your progress is saved automatically.
- Telegram installed, account created, and bot token savedVerify: you have a bot token from BotFather (looks like 7123456789:AAF...)
- OpenRouter API key savedVerify: key starts with sk-or- and you have credits loaded
- DigitalOcean droplet running with OpenClawVerify: dashboard loads in your browser and shows "connected"
- Telegram bot connected and respondingVerify: send a message to your bot in Telegram and get a reply
Need Help? Don't Wait.
If you get stuck on any step, email Brad and Domenic at [email protected]. We'll walk you through it before the workshop so you're not scrambling day-of.
Haven't registered yet? Learn about the workshop →